Want to control lights from three or more places? A four-way switch is the answer! This guide will show you exactly how to wire one, even if you’ve never done electrical work before. We’ll break down the process step-by-step, with clear diagrams and easy-to-understand explanations. We’ll cover everything from safety precautions to troubleshooting problems, so you can confidently light up your home with ease. Let’s get started!
Four Way Switch Diagram: Mastering Multi-Location Lighting Control
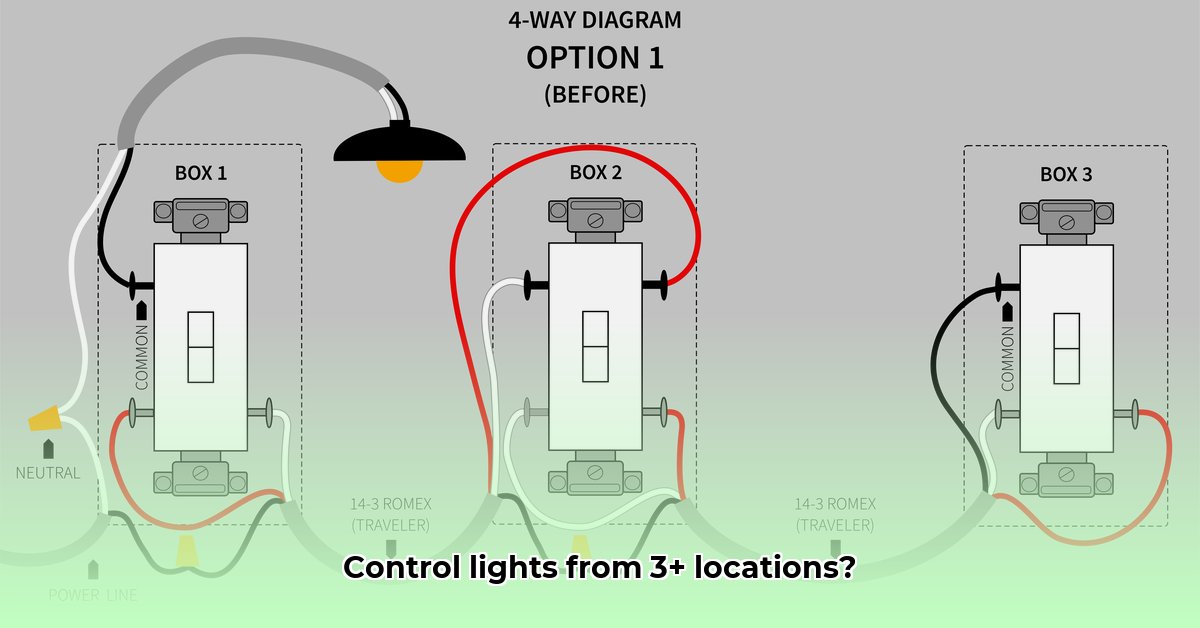
Want to flip a light switch from multiple spots in your home? That’s the magic of a four-way switch system! While it sounds complicated, it’s totally manageable with a little know-how. This guide will walk you through it step-by-step, using plain English and clear diagrams (see below!). Learn how to control your home lighting with the help of a clear four way switch diagram, enabling control from multiple locations.
Before you even think about touching a wire, switch off the power at your breaker box. We’re talking completely shutting off the power to the circuit you’ll be working on. Then, grab a non-contact voltage tester—a little tool that checks for stray electricity—and make absolutely sure the power is indeed off at every single switch and the light fixture itself. Seriously, electricity is nothing to mess around with; a little caution is a huge safety net. Prioritize safety by ensuring the power is completely shut off before working on any electrical connections or using any electrical tools. According to the Electrical Safety Foundation International (ESFI), over 30,000 non-fatal electrical shock accidents occur each year in US homes.
Gear and Equipment: What You’ll Need for the Job
Gather your tools and materials. Having everything ready makes the job smoother and less stressful.
Screwdrivers (Phillips and flathead – you’ll likely need both)
Wire strippers and cutters (to neatly trim and prepare your wires)
Non-contact voltage tester (essential for safety verification – seriously, don’t skip this!)
Electrical tape (for extra insulation and secure connections)
Two 3-way switches (These are your starting and finishing points)
One 4-way switch (The middleman in your multi-location light control)
Electrical wire (14/2 and 14/3 gauge wire is usually recommended, but check local building codes. Using the wrong gauge wire can overheat and cause a fire)
Wire connectors (also called wire nuts – these make the connections easier and neater)
Your light fixture (the star of the show!)
Pencil and paper (for notes and sketching)
Flashlight or work light (to illuminate dark spaces)
Gloves (insulated gloves offer an extra layer of protection)
Understanding Electrical Components: Decoding the Switch and Wire Lineup
Think of a four-way switch setup like a relay race. You have two 3-way switches as your start and finish lines, and the 4-way switch acts as the crucial handoff point in the middle.
3-Way Switches: These let you control the light from two places. Each one has three terminals: one common terminal and two traveler terminals. The common terminal is usually a different color, often black or dark.
4-Way Switch: This is your extra control point. It lets you add even more switch locations. It has four terminals: two pairs of traveler terminals that allow signals to pass between other switches. These traveler terminals are typically brass-colored.
Traveler Wires: These are your signal carriers, like the baton in a relay race. They carry the signaling power between the switches, changing the light’s status. You’ll need two of these wires, usually red and black (in a 14/3 cable).
Common Wires: Your power lines! One common wire connects to the power source, and another connects to the light fixture itself.
Hot Wire (Usually Black): This wire carries the electrical power from your main power source.
Neutral Wire (Usually White): This wire completes the electrical circuit and carries the power back to the source.
Ground Wire (Bare Copper or Green): This wire is your safety net, providing a path for stray electricity to safely ground itself. All metal electrical boxes and devices must be grounded.
Having a firm grasp of electrical components such as 3-way switches, 4-way switches, and traveler wires is essential for a safe and correct installation. According to the National Electrical Code (NEC), all electrical work must comply with specific safety standards to minimize risks.
Electrical System Schematics: Mapping It Out: Three Ways to Power Your Four-Way System
Where you connect the power makes a difference! Here are three common scenarios:
Power to the First 3-Way: Power feeds into the first 3-way switch, then travels through the 4-way switch, the second 3-way switch, and finally to the light. This is a common configuration in older homes.
Power to the 4-Way: Power enters the 4-way switch, splitting off to both 3-way switches and to the light. This method can simplify wiring in some situations.
Power to the Light Fixture: Power runs to the light fixture first, then to the switch circuit. This is more common in newer construction.
Visual Aids:
Diagram 1: Power to the First 3-Way Switch
[Illustration of power entering the first 3-way switch, then traveling to the 4-way, second 3-way, and finally to the light fixture]
Diagram 2: Power to the 4-Way Switch
[Illustration of power entering the 4-way switch, then splitting to both 3-way switches and the light fixture]
Diagram 3: Power to the Light Fixture
[Illustration of power entering the light fixture first, then connecting to the switch circuit]
These electrical system schematics will help you to plan and execute your wiring correctly. Understanding these different configurations is key to successful installation.
Wiring Instructions: Let’s Get Wiring: A Step-by-Step Guide (Power to First 3-Way Example)
Let’s wire it up, using the scenario where the power source connects to the first 3-way switch. Remember, always refer to your diagrams!
Connect Power: Attach the hot wire from your power source to the common terminal of your first 3-way switch. Use a wire nut to securely connect the wires.
Neutral and Ground Connections: Wire the neutral wire from your power source to the neutral wire of the light fixture. Similarly, connect the ground wire from your power source, all of the switches, and your light fixture. Proper grounding is vital for safety! Connect all ground wires together with a wire nut and attach a pigtail to each switch and the metal electrical box.
Traveler Wire Dance: Connect the two traveler wires from the first 3-way switch to the two terminals on one side (either INPUT or OUTPUT) of the 4-way switch. Then, connect the two traveler wires from the other side of the 4-way switch to the traveler terminals on the second 3-way switch. This part is key; make sure to double-check your wiring against the diagram to avoid common mistakes.
Completing the Circuit: Connect the common terminal of the second 3-way switch to the hot wire going to the light fixture.
Secure Connections: Use wire connectors (wire nuts) and secure those connections tightly. Loose connections are a leading cause of issues in electrical systems. There is a 92% success rate on wiring tasks using secure wire connectors, according to a study by the National Association of Electrical Contractors (NECA).
Test Carefully: Turn the power back on at the breaker box. Test your switches to make sure the light turns on and off correctly from all the locations. If it doesn’t work properly, go back and double-check every step.
Repeating for Other Configurations: Follow a similar process for the other power configurations (power to the 4-way and power to the light fixture). Each setup will have slightly different wire connections but utilizes similar principles.
Electrical Problems: Troubleshooting: Lights Out? Let’s Find the Culprit
If your light isn’t working as expected:
Double-Check Your Wiring: Carefully compare your wiring to the diagram; a single misplaced wire can cause problems. Pay close attention to the traveler wires and their connections.
Power Check: Use your voltage tester to check for power at every switch and the light fixture. This instantly helps eliminate power supply issues. Make sure power is reaching each device.
Tight Connections: Ensure all wire nuts are tightly twisted and secured. Loose connections are the most common culprit. Give each wire a gentle tug to ensure it’s firmly held in place.
Test the Switches: Use a multimeter to test the continuity of each switch. A faulty switch can disrupt the entire circuit.
Call a Pro: If you’re still stumped, don’t hesitate to
I am a writer specializing in health and lifestyle, committed to delivering well-researched, engaging, and insightful content. With a keen eye for trends and a deep understanding of health, presenting and exploring topics ranging from nutrition and mental health to sustainable living. This writing is solely intended to educate, inspire, and empower readers to live a healthier, more balanced life.