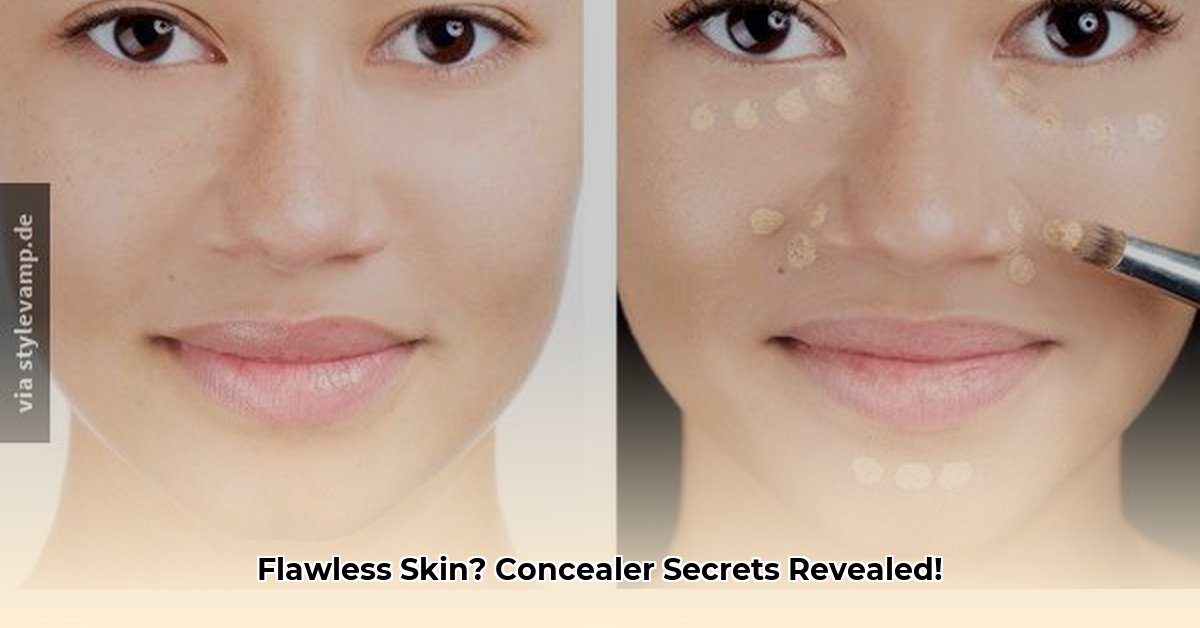
Want that coveted “no-makeup” makeup look while still addressing a few imperfections? Pinpoint concealing, championed by makeup artist Lisa Eldridge, is your secret weapon. This technique focuses on applying concealer only where you actually need it, resulting in a natural, radiant finish that lets your real skin shine through. This comprehensive guide provides a step-by-step approach, product recommendations (including Lisa’s favorites and budget-friendly alternatives), and expert tips to achieve a flawless, natural look.
Prepping Your Canvas: The Essential First Step
Before diving into concealing, prepping your skin is crucial. Think of it like priming a canvas before painting. A good moisturizer creates a smooth, hydrated base, preventing concealer from clinging to dry patches. A primer (optional) can further smooth the surface and enhance makeup longevity. A lightweight foundation or skin tint can create a more uniform complexion, but the beauty of pinpoint concealing is that it works beautifully with or without a base.
The Art of Pinpoint Concealing: A Step-by-Step Guide
1. Identify Your Targets
Examine your skin and pinpoint the areas needing attention. Focus on blemishes, redness, dark spots, or any imperfections you’d like to address. Remember, less is more!
2. Apply with Precision
Using a small, pointed brush, a clean fingertip, or Lisa Eldridge’s Seamless Skin Concealer, apply tiny dots of concealer directly onto the targeted areas. A brush provides precision, while the warmth of your fingertip can help melt the concealer into the skin.
3. Blend Like a Dream
Gently blend the concealer into your skin using small, circular motions. A brush, fingertip, or damp makeup sponge can work—choose your preferred tool. Avoid rubbing or dragging, which can disrupt the concealer and create streaks.
4. Build Coverage Gradually
If needed, build coverage by repeating the application and blending steps. Thin layers prevent a cakey look and offer better control over coverage.
5. Set with Powder (Optional)
A light dusting of translucent setting powder can set your concealer, prevent creasing, and boost longevity. This step is especially helpful for oily skin or areas prone to creasing.
Concealer Arsenal: Recommendations for Every Budget
Choosing the right concealer can be overwhelming. Here’s a curated list of recommendations, including Lisa’s go-to and affordable dupes:
| Concealer | Texture | Coverage | Finish | Skin Type | Notes |
|---|---|---|---|---|---|
| Lisa Eldridge Seamless | Creamy | High | Natural | All | Lisa’s favorite, known for its creamy texture and blendability. |
| Laura Mercier Secret Camouflage | Creamy | Full | Natural | All | Another favorite of Lisa’s, excellent for spot concealing. |
| NARS Radiant Creamy | Creamy | High | Radiant | Normal to Dry | Luxurious feel, provides a luminous glow. |
| Maybelline Fit Me | Liquid | Medium | Natural | All | Drugstore favorite, offers good coverage and a wide shade range. |
| Tarte Shape Tape | Liquid | Full | Matte | All | Very full coverage, best for oily skin. |
| e.l.f. Camo Concealer | Creamy | Full | Matte | All | Budget-friendly option with excellent coverage. |
(This table can be updated with newer product recommendations.)
Mastering the Technique: Tips and Tricks
- Less is More: Begin with a tiny amount of concealer and build as needed.
- Match Your Shade: Choose a concealer that matches your foundation or skin tone.
- Blend, Blend, Blend: Seamless blending is key for a natural finish.
- Hydrate: Well-hydrated skin is essential for preventing cakey concealer.
- Setting Spray: A setting spray can help melt everything together for an even more seamless finish. Some makeup artists prefer this to powder, especially for drier skin types. Experiment to see what works best for you!
Troubleshooting Common Concealer Concerns
- Creasing: Use less product, set with powder, or try a finer-milled powder. A hydrating eye cream before concealing can also help.
- Dryness: Moisturize well beforehand and choose a hydrating concealer. Look for ingredients like hyaluronic acid or glycerin.
- Wrong Shade: Test shades in natural light. For under-eye circles, some suggest a slightly lighter shade with a peach or yellow undertone to counteract bluish hues.
Why Pinpoint Concealing Might Be Your New Go-To
Pinpoint concealing offers several advantages over traditional methods:
- Natural Finish: It avoids the heavy, mask-like effect sometimes associated with full-face concealer application.
- Less Product: You use less concealer, which can be more cost-effective and gentler on your skin.
- Enhanced Skin Health: Allows your skin to breathe and can be less likely to clog pores.
- Targeted Coverage: Focuses on specific imperfections, letting your natural skin shine through.
Beyond the Basics: Adapting the Technique
While Lisa Eldridge often uses her finger for blending, a small, dense brush can also be effective. For dry skin, extra moisturizing is key. For the under-eye area, consider a lighter, more hydrating concealer, as some evidence suggests heavier formulas may exacerbate fine lines. Don’t be afraid to adapt the technique to your needs and preferences!
This comprehensive guide provides a solid foundation for mastering pinpoint concealing. Remember, practice makes perfect. Experiment, have fun, and embrace the beauty of your natural skin! Share your tips and favorite products in the comments below!
- Top Books on Meditation for Starting or Deepening Your Practice - February 7, 2026
- Top Rated Books on Mindfulness to Find Your Calm - February 6, 2026
- Top Rated Meditation Books to Deepen Your Practice - February 5, 2026


