Need some peace and quiet? This guide shows you how to take control of your Mac’s sounds, from quickly muting everything to silencing specific apps like FaceTime. We’ll cover everything from simple clicks to more advanced techniques, so you can customize your Mac’s audio exactly how you want.
Sometimes, you need quiet now. Here are the quickest ways to mute your Mac:
Use the Mute Key: Press the F10 key (or Fn + F10 on some keyboards). This mutes all system audio instantly. Press it again to unmute. (See screenshot 1)
[Screenshot 1: Keyboard with F10 key highlighted]
Adjust the Volume Slider: Click the speaker icon in the menu bar and drag the slider all the way down. This also silences all audio. (See screenshot 2)
[Screenshot 2: Menu bar volume slider at zero]
These methods mute all audio temporarily. The sound will return when you restart, adjust the volume, or press the mute key again.
Taming FaceTime Notifications
FaceTime calls can be disruptive. Here’s how to control them:
Method 1: Mute Just the Ringer
Open System Settings: Click the Apple menu () in the top left corner of your screen, then select “System Settings.” (On older macOS versions, this is “System Preferences.”) (See screenshot 3)
[Screenshot 3: Apple Menu with System Settings highlighted]
Go to Notifications: Click on “Notifications.” (On some systems, this may be combined with “Focus” as “Notifications & Focus.”) (See screenshot 4)
[Screenshot 4: System Settings with Notifications highlighted]
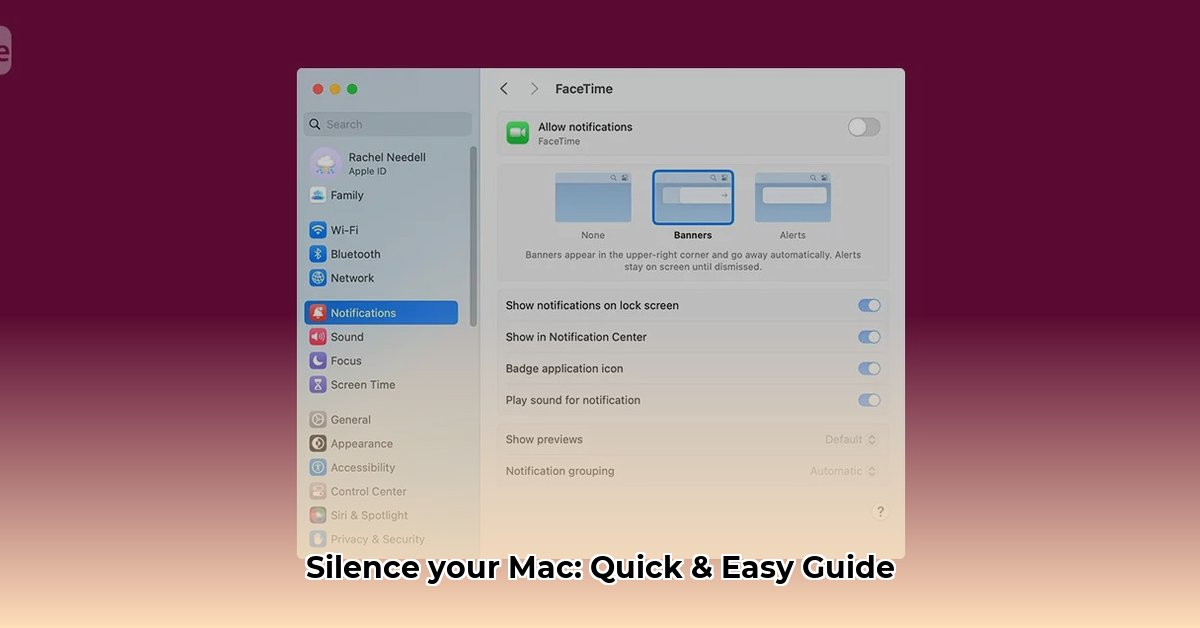
Select FaceTime: Scroll down and click “FaceTime.” (See screenshot 5)
[Screenshot 5: Notifications panel with FaceTime selected]
Uncheck “Play sound for notifications”: This mutes the ringer but still shows visual notifications. (See screenshot 6)
[Screenshot 6: FaceTime notification settings with “Play sound for notifications” unchecked]
Method 2: Disable FaceTime Notifications Entirely
Follow steps 1-3 above, then toggle off “Allow Notifications.” This stops all FaceTime alerts. (See screenshot 7)
[Screenshot 7: FaceTime notification settings with “Allow Notifications” toggled off]
Method 3: Disable FaceTime Completely
Open the FaceTime app.
Go to the Menu Bar: Click “FaceTime” in the menu bar.
Turn FaceTime Off: Select “Turn FaceTime Off.” This prevents all incoming FaceTime calls.
Using Do Not Disturb
Do Not Disturb creates a temporary (or scheduled) quiet zone.
Open Control Center: Click the Control Center icon in the menu bar. (See screenshot 8)
[Screenshot 8: Control Center icon in menu bar]
Select Focus: Click “Focus.”
Choose Do Not Disturb: Click “Do Not Disturb.” (See screenshot 9)
[Screenshot 9: Control Center with Do Not Disturb highlighted]
You can customize Do Not Disturb (duration, allowed contacts, etc.) in System Settings > Focus > Do Not Disturb. Holding the “Option” key while clicking the Focus icon in the Control Center activates Do Not Disturb instantly.
Controlling Other Notification Sounds
You can customize notification sounds for individual apps within System Settings > Notifications. Just select the app and adjust its notification settings.
Comparison Table
Method
Description
Duration
Affects Other Notifications
Mute System Sounds (F10)
Quickly silences all system audio.
Temporary
Yes
Adjust Output Volume
Silences all audio output via the menu bar.
Temporary
Yes
Mute FaceTime Ringer
Silences FaceTime calls but allows visual alerts.
Until changed
No
Disable FaceTime Notifications
Stops all FaceTime alerts.
Until changed
No
Disable FaceTime
Prevents all FaceTime calls.
Until changed
No
Do Not Disturb
Silences most notifications; customizable.
Temporary/Scheduled
Yes, but configurable
Troubleshooting
FaceTime still ringing? Double-check your notification settings and ensure Do Not Disturb isn’t active. Restarting your Mac often helps.
iPhone calls ringing on your Mac? Check your iPhone’s settings (Settings > Phone > Calls on Other Devices) and disable call forwarding to your Mac.
Tips & Tricks
Silence the Startup Chime: Open Terminal and enter the command sudo nvram SystemAudioVolume=%80. You’ll need to enter your administrator password. To re-enable the chime, use the command sudo nvram -d SystemAudioVolume. Proceed with caution when using Terminal commands.
Explore Focus Modes: Focus modes provide more granular control over notifications. You can create custom profiles for work, personal time, etc., and they can automatically activate based on your schedule or location. Some experts suggest exploring these for highly personalized sound control.
Conclusion
Silencing your Mac is easy, with several methods to choose from. Experiment and find what works for you. While this guide covers several macOS versions, menu options may vary slightly. If you have further questions, current Apple support documentation may offer additional clarification. Let us know if you have any questions or feedback!
I am a writer specializing in health and lifestyle, committed to delivering well-researched, engaging, and insightful content. With a keen eye for trends and a deep understanding of health, presenting and exploring topics ranging from nutrition and mental health to sustainable living. This writing is solely intended to educate, inspire, and empower readers to live a healthier, more balanced life.